Créer une clé USB Windows 10 sur une machine Linux
Il m’arrive souvent de devoir dépanner des PCs, et généralement les utilisateurs en questions ne sont pas prêt à faire le pas vers un système Linux. Changement des habitudes, ou dépendance à un logiciel propriétaire qui dépend de leur OS Windows. Face à ces arguments pas d’autre choix que de procéder à l’installation de Windows via une une clé USB ou une carte SD. Il y a plusieurs utilitaires pour faire ça, principalement disponible sur Windows mais il est possible de le faire assez simplement avec quelques commandes Shell.
Obtenir Windows et créer la clé
Commençons par l’essentiel si ce n’est pas déjà fait, télécharger Window, pendant ce temps vous pouvez préparer votre media de destination.
Avec fdisk, il faut créer un disque avec une table GPT et deux partitions.
La première d’1Go pour stocker les fichiers du boot UEFI. La seconde avec le reste
de l’espace pour les fichiers du système. Je ne fournis pas de commande magique
mais le détail des opérations à réaliser. Faites bien attention lors du
choix du disque, afin d’être certain qu’il correspond bien à votre clé USB. Dans
les exemples qui suivent j’utilise /dev/sda. A vous d’ajuster les commandes
avec l’id de votre périphérique.
Lancer une session root pour utiliser l’outil de partitionnement fdisk avec le path
de votre device comme argument.
# fdisk /dev/sda

Welcome to fdisk (util-linux 2.35.2).
Changes will remain in memory only, until you decide to write them.
Be careful before using the write command.

Command (m for help): g
Created a new GPT disklabel (GUID: ABFB3DF3-2D77-204A-B0DD-6CA3EE2BBD17).

Command (m for help): n
Partition number (1-128, default 1):
First sector (2048-60063710, default 2048):
Last sector, +/-sectors or +/-size{K,M,G,T,P} (2048-60063710, default 60063710): +1G

Created a new partition 1 of type 'Linux filesystem' and of size 1 GiB.
Partition #1 contains a vfat signature.

Do you want to remove the signature? [Y]es/[N]o: Y

The signature will be removed by a write command.

Command (m for help): t
Selected partition 1
Partition type (type L to list all types): 11
Changed type of partition 'Linux filesystem' to 'Microsoft basic data'.

Command (m for help): n
Partition number (2-128, default 2):
First sector (2099200-60063710, default 2099200):
Last sector, +/-sectors or +/-size{K,M,G,T,P} (2099200-60063710, default 60063710):

Created a new partition 2 of type 'Linux filesystem' and of size 27.7 GiB.
Partition #2 contains a ntfs signature.

Do you want to remove the signature? [Y]es/[N]o: Y

The signature will be removed by a write command.

Command (m for help): t
Partition number (1,2, default 2):
Partition type (type L to list all types): 11

Changed type of partition 'Linux filesystem' to 'Microsoft basic data'.

Command (m for help): p
Disk /dev/sda: 28.66 GiB, 30752636928 bytes, 60063744 sectors
Disk model: Ultra
Units: sectors of 1 * 512 = 512 bytes
Sector size (logical/physical): 512 bytes / 512 bytes
I/O size (minimum/optimal): 512 bytes / 512 bytes
Disklabel type: gpt
Disk identifier: ABFB3DF3-2D77-204A-B0DD-6CA3EE2BBD17

Device       Start      End  Sectors  Size Type
/dev/sda1     2048  2099199  2097152    1G Microsoft basic data
/dev/sda2  2099200 60063710 57964511 27.7G Microsoft basic data

Filesystem/RAID signature on partition 1 will be wiped.
Filesystem/RAID signature on partition 2 will be wiped.

Command (m for help): w
The partition table has been altered.
Syncing disks.
Une fois le partitionnement de votre clé fait, vous devez créer un filesystem VFAT sur la partition d’1 Go et NTFS sur la seconde.
# mkfs.vfat /dev/sda1
mkfs.fat 4.1 (2017-01-24)
# mkfs.ntfs -f /dev/sda2
Cluster size has been automatically set to 4096 bytes.
Creating NTFS volume structures.
mkntfs completed successfully. Have a nice day.
Le plus dur est fait ! Maintenant, après avoir monté l’ISO Windows et les partitions de votre clé, vous allez pouvoir succéder les commandes de copies à destination de vos 2 partitions.
# mkdir /tmp/winiso /tmp/winusb /tmp/winusb-efi
# mount /dev/sda1 /tmp/winusb-efi/
# mount /dev/sda2 /tmp/winusb
# mount -o loop ./Win10_1909_French_x64.iso /tmp/winiso
mount: /tmp/winiso : WARNING: device write-protected, mounted read-only.
# rsync -rh --info=progress2 --exclude sources /tmp/winiso/ /tmp/winusb-efi
         42.84M 100%  164.74MB/s    0:00:00 (xfr#83, to-chk=0/97
# mkdir /tmp/winusb-efi/sources
# rsync -rh --info=progress2 /tmp/winiso/sources/boot.wim  /tmp/winusb-efi/sources/
        545.75M 100%  164.38MB/s    0:00:03 (xfr#1, to-chk=0/1)
# rsync -rh --info=progress2 /tmp/winiso/sources  /tmp/winusb/
          5.39G 100%   25.83MB/s    0:03:19 (xfr#859, to-chk=0/931
# umount /dev/sda1 /dev/sda2
La clé est à présent prête ! Rien de très complexe au final et ça ce script facilement au besoin.
Installer Windows
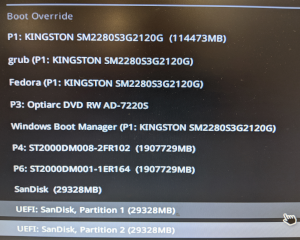
Au redémarrage, forcer le boot de votre PC sur la clé USB. Votre bios doit détecter un device bootable en UEFI comme sur l’image ci-dessous. La suite c’est une installation classique Windows avec des redémarrages et des mises à jour…